
Unlock the full potential of your Android device by enabling Developer Options. This often-hidden menu provides access to a wealth of advanced features and settings, allowing you to customize your phone or tablet like never before. Whether you’re a seasoned developer, a curious tech enthusiast, or simply looking to tweak your device’s performance, learning how to enable Developer Options is a crucial first step.
This guide provides a clear and concise walkthrough on how to access Developer Options on various Android devices, regardless of the manufacturer or Android version. We’ll cover the steps needed to activate this powerful suite of tools, empowering you to debug apps, adjust animations, simulate different locations, and much more. Follow along and unlock the developer within your Android device. Discover the hidden potential and gain greater control over your mobile experience with our easy-to-follow instructions on enabling Developer Options.
What Are Developer Options?
Developer options are a hidden menu within Android settings that provides access to advanced system configurations. These settings are intended for software developers to test and debug applications during the development process. They are typically hidden by default to prevent accidental modification by average users, which could potentially lead to instability or unexpected behavior.
These options offer a wide range of tools and configurations. For example, you can enable USB debugging for connecting your device to a computer for development purposes. You can also tweak animation speeds, limit background processes, and even simulate different locations for app testing.
While beneficial for developers, these settings can be useful for advanced users who wish to customize their device beyond the standard options. However, it is important to proceed with caution when modifying these settings as incorrect configurations can negatively impact your device’s performance and stability.
Unlocking Developer Mode
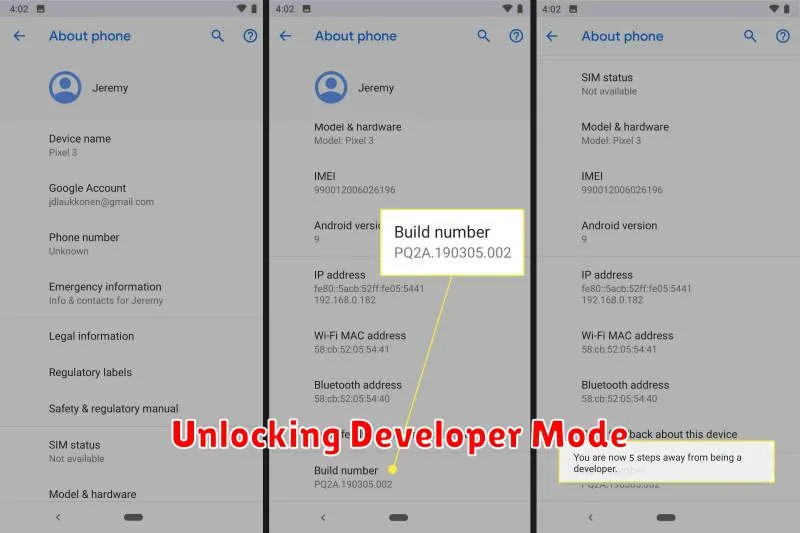
Accessing Developer Options on your Android device involves a few simple steps, starting with finding your device’s Build Number.
Typically located within the About Phone section of your device’s settings, the exact location of the Build Number can vary slightly depending on the manufacturer and Android version. Navigate to Settings, then look for About Phone (or similar wording). Inside this menu, you should find the Build Number.
Once you’ve located the Build Number, tap on it repeatedly. You’ll see a toast notification counting down the taps until you are a developer. After several taps, a message will appear confirming that you have unlocked Developer Options.
Now, return to the main Settings menu. You should now see Developer Options listed, often near the bottom or in a “System” sub-menu.
Useful Developer Features
Once you’ve enabled Developer Options, a world of customization and advanced features becomes available. Here are a few noteworthy options:
Debugging
USB Debugging is essential for connecting your device to a computer for development purposes. It allows for actions like installing apps directly from your development environment and viewing logs.
Performance Tuning
Options like Window animation scale, Transition animation scale, and Animator duration scale can be adjusted to speed up or slow down animations, providing insights into performance or simply changing the “feel” of the device.
Networking
Mobile data always active keeps your mobile data connection on even when connected to Wi-Fi, ensuring a seamless transition between networks. Show touches visually displays where you are touching the screen, helpful for presentations or recordings.
Layout/Drawing
Show layout bounds outlines each view on the screen, making it easier to understand the structure of your user interface.
Risks and Precautions
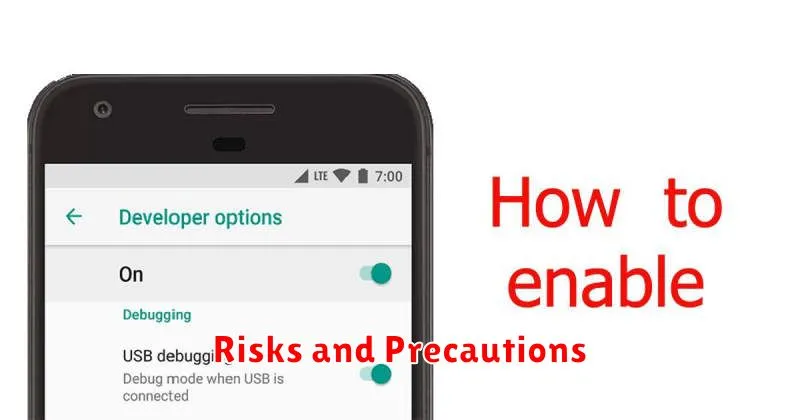
While Developer Options offer valuable tools for customizing and debugging your Android device, it’s crucial to understand the associated risks and exercise caution. Modifying certain settings can lead to unexpected behavior and potentially compromise the stability and security of your device.
Key risks include inadvertently enabling settings that could drain your battery faster, disrupt normal app functionality, or expose your device to security vulnerabilities. It’s also possible to unintentionally change settings that could make your device unusable, necessitating a factory reset.
Important precautions to take include thoroughly researching any setting before modifying it, noting down the original setting before making changes so you can revert if necessary, and avoiding enabling options you don’t fully understand. If you encounter any issues after changing a setting, immediately disable it or revert to the original configuration.
Resetting to Default Settings
If you’ve enabled Developer Options and made changes you’d like to revert, Android provides a simple way to reset these settings back to their defaults. This process is straightforward and doesn’t require any complex procedures.
To reset Developer Options, navigate to your device’s Settings app. Then, locate the System settings. Within the System settings, find and select Reset options. You’ll see a few reset options listed. The option you’re looking for is typically labeled Reset app preferences or something similar. Note that this might differ slightly depending on your Android version and device manufacturer.
After selecting this option, you’ll be presented with a confirmation dialog explaining what will be reset. This usually includes app preferences, disabled apps, and, importantly, Developer Options. Confirm your selection, and your Developer Options will be deactivated, and any customized settings within them will be returned to their original state.